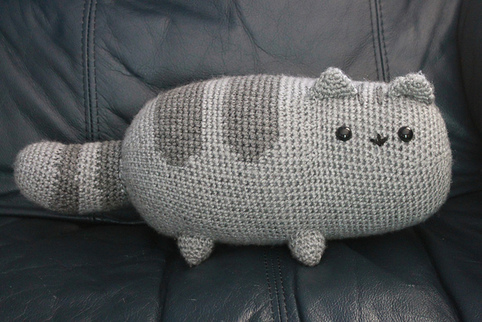
Here is a free pattern that you can follow to make your own Pusheen the cat!
Supplies needed: Stitch and technique abbreviations:
1 skein (200 yards) of Red Heart Soft© Single crochet: sc
yarn in Light Grey Heathers Increase: sc 2 in next st
75 yards of Red Heart Super Saver Solids© Decrease: dec
in Dark Grey Heathers Slip stitch: sl st
1 4.00 MM (size 6) crochet hook Stitch(es): st(es)
A pair of 12.00 MM black plastic craft eyes Fasten off: fo
A tapestry (darning) needle Magic ring: mr Polyester stuffing Half double crochet: hdc
10" of black yarn for the mouth
A Little Info On Color Change
To make Pusheen's striped, you will have to use two (2) different colors in the same round, which will result in having to make a lot of color changes. But on what stitch do we make the color changes? That is what this little section is here for.
Take round 25 for example.
The pattern says: With the dark grey yarn, Sc in next 26 st. With the light grey yarn, sc in next 46 st.
So, when (and where) would we make the color change? First, let me show you how to make a color change:
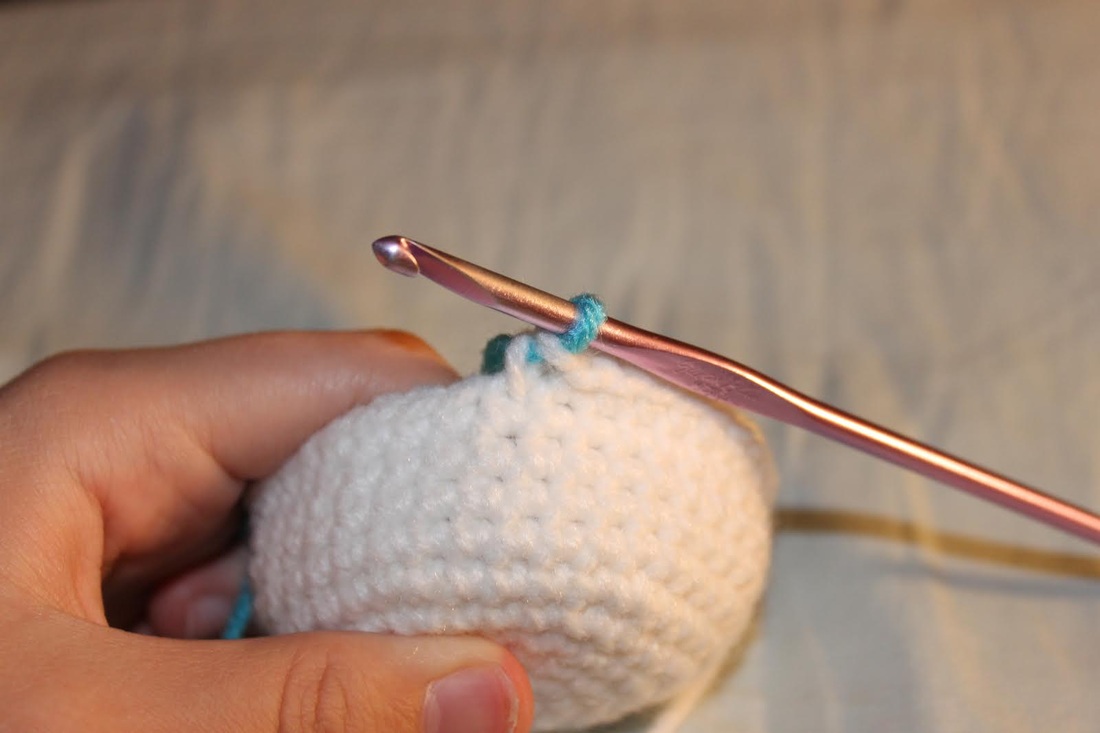
1. Insert your hook into the next stitch and pull up a loop of the working yarn (as though you were crocheting a single crochet stitch)
Supplies needed: Stitch and technique abbreviations:
1 skein (200 yards) of Red Heart Soft© Single crochet: sc
yarn in Light Grey Heathers Increase: sc 2 in next st
75 yards of Red Heart Super Saver Solids© Decrease: dec
in Dark Grey Heathers Slip stitch: sl st
1 4.00 MM (size 6) crochet hook Stitch(es): st(es)
A pair of 12.00 MM black plastic craft eyes Fasten off: fo
A tapestry (darning) needle Magic ring: mr Polyester stuffing Half double crochet: hdc
10" of black yarn for the mouth
A Little Info On Color Change
To make Pusheen's striped, you will have to use two (2) different colors in the same round, which will result in having to make a lot of color changes. But on what stitch do we make the color changes? That is what this little section is here for.
Take round 25 for example.
The pattern says: With the dark grey yarn, Sc in next 26 st. With the light grey yarn, sc in next 46 st.
So, when (and where) would we make the color change? First, let me show you how to make a color change:
1. Insert your hook into the next stitch and pull up a loop of the working yarn (as though you were crocheting a single crochet stitch)
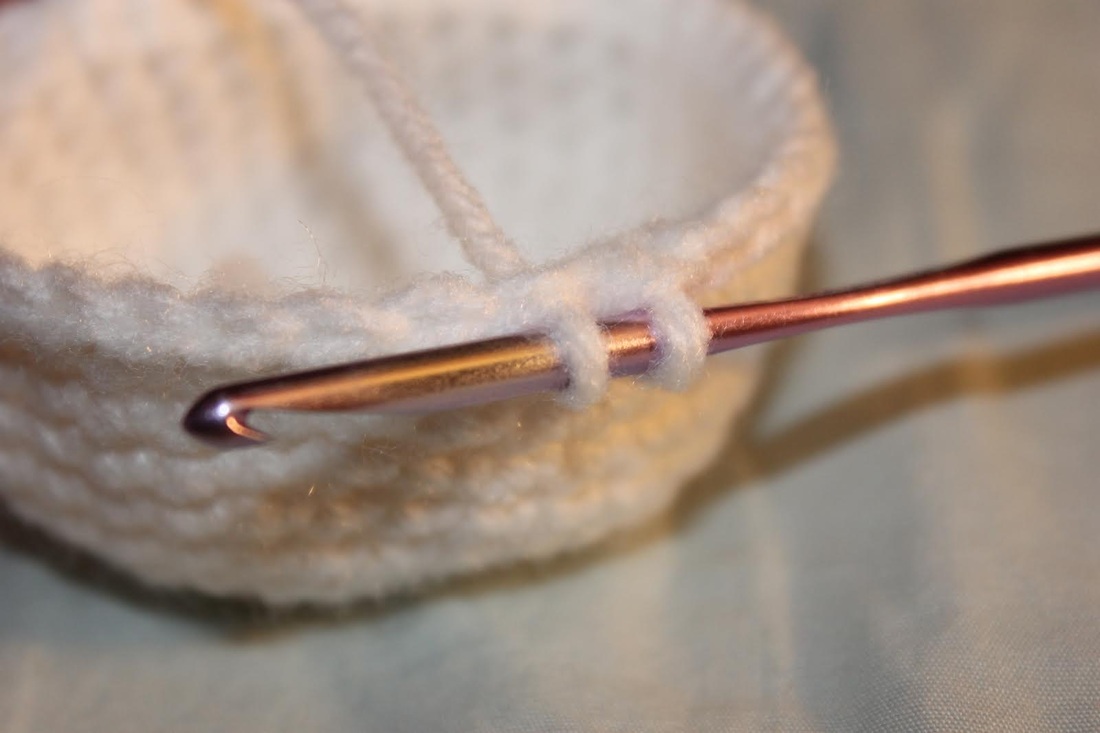 |
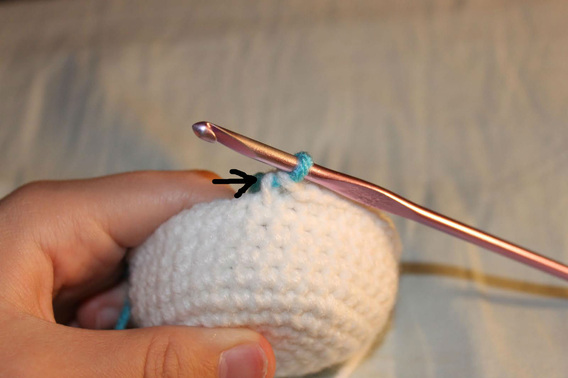
2. Instead of wrapping your working yarn over your hook and completing the stitch, loop over the new yarn.
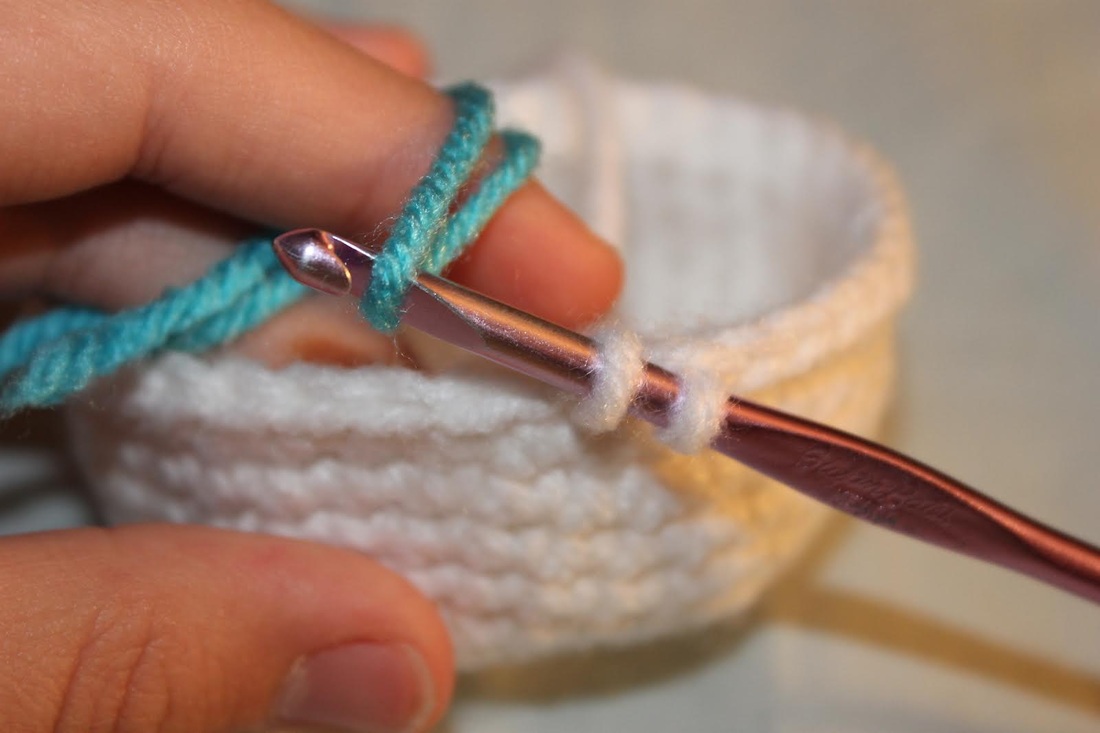 |
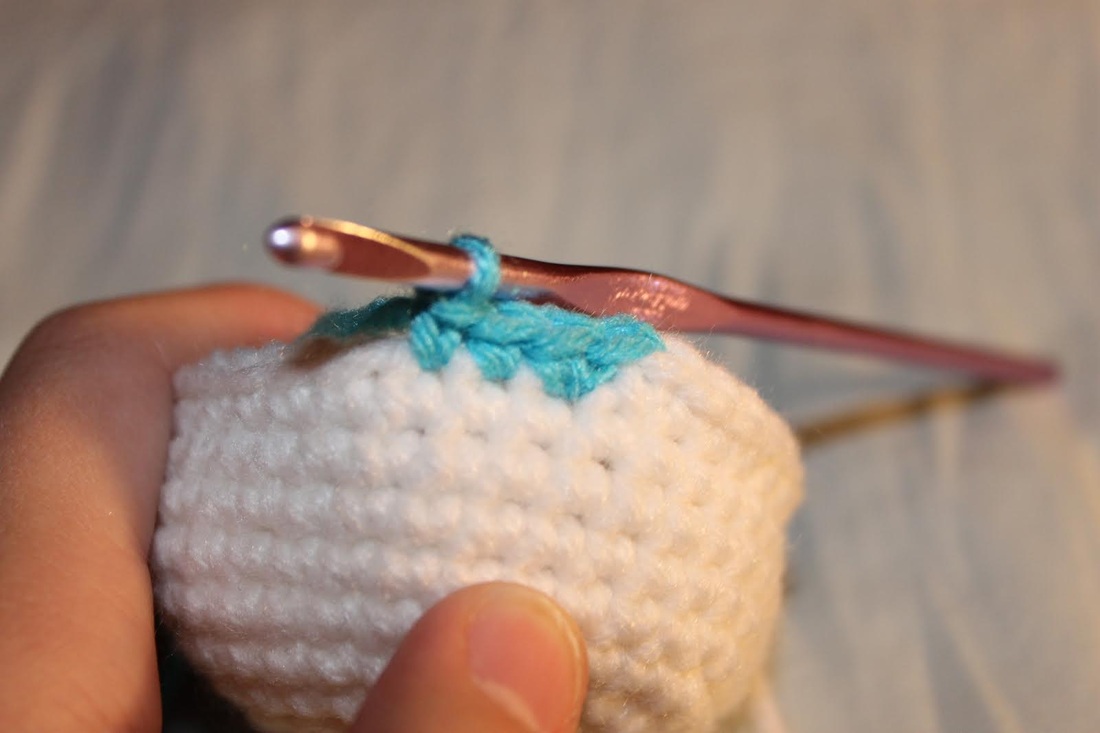
3. Then, pull the new yarn through both of the loops on your hook to complete the stitch.
 |
4. After that, you can continue crocheting.
 |
Now, the piece I am working on above has 36 stitches in the round I was working. But when I did the color change, I only crocheted 35 of them (the color change in the piece I was working took place at the beginning of the round, so the stitches that were crocheted with the blue yarn were the first stitches of that round). Why? Because when you make a color change, you create a whole other stitch. So, after I crocheted 35 stitches that round, I made a color change in the last stitch.
And that finished the round. Then, I began the new round with the new color (in this case, blue).
In the Pusheen pattern, you won't always make a color change at the end of the round.
Let's use round 25 for example. The pattern for this round is:
Sc in next 26 st, make a color change, sc in next 46, make a color change.
For this round, with will start out by crocheting 25 stitches with the working yarn (the dark grey yarn), and then you will make a color change (creating the 26th st). Then, you will crochet in the next 45 st, then you will make a color change to the other yarn (the dark grey yarn, as you were previously crocheting with the light grey yarn). Then, you will follow the instructions for round 26.
Please make sure that you read all of these instructions before starting your project so that you understand the steps to complete this project.
The head/body pattern
Start with the light grey yarn.
1) Mr, sc 6 into the ring (6 st)
2) Sc 2 in each st (12 st)
3) *sc 2 in next st, sc in next st* 6 times (18 st)
4) *sc 2 in next st, sc in next 2 st* 6 times (24 st)
5) *sc 2 in next st, sc in next 3 st* 6 times (30 st)
6) *sc 2 in next st, sc in next 4 st* 6 times (36 st)
7) *sc 2 in next st, sc in next 5 st* 6 times (42 st)
8) *sc 2 in next st, sc in next 6 st* 6 times (48 st)
9) *sc 2 in next st, sc in next 7 st* 6 times (54 st)
10) *sc 2 in next st, sc in next 8 st* 6 times (60 st)
11) Sc in each st (60 st)
12) *sc 2 in next st, sc in next 9 st* 6 times (66 st)
13) Sc in each st (66 st)
14) *sc 2 in next st, sc in next 10 st* 6 times (72 st)
15-16) Sc in each st (72 st in each round)
17) Sc in each st, cc on the last st (72 st)
18) With the dark grey yarn, sc in next 26 st (cc on the 26th st) With the light grey yarn, sc in next 45 st (cc on the 45th st), with the dark grey yarn, sc in next st (72 st)
19) With the dark grey yarn, sc in next 27 st (cc on the 27th st) With the light grey yarn, sc in next 43 st (cc on the 43rd st), with the dark grey yarn, sc in next 2 st (72 st)
20-21) With the dark grey yarn, sc in next 28 st (cc on the 28th st) With the light grey yarn, sc in next 42 st (cc on the 42nd st) With the dark grey yarn, sc in next 2 st (72 st)
22) With the dark grey yarn, sc in the next 28 st (cc on the 28th st) With the light grey yarn, sc in next 43 st (cc on the 43rd) With the dark grey yarn, sc in next st (72 st)
23) With the dark grey yarn, sc in next 27 st (cc on the 27th st) With the light grey yarn, sc in next 45 st (cc on the 45th st) (72 st)
24) With the dark grey yarn, sc in next 26 st (cc on the 26th st) With the light grey yarn, sc in next 46 st (72 st)
25) With the light grey yarn, sc in next st (cc on that st) With the dark grey yarn, sc in next 24 st (cc in the 24th st) With the light grey yarn, sc in next 47 st (72 st)
26-29) With the light grey yarn, sc in each st (72 st in each round)
30) With the light grey yarn, sc in the next 2 st (cc on the 2nd st) With the dark grey yarn, sc in next 26 st (cc on 26th st) With the light grey yarn, sc in next 44 st (72 st)
31) With the light grey yarn, sc in the next st (cc on that st) With the dark grey yarn, sc in next 28 st (cc on the 28th st) With the light grey yarn, sc in next 42 st (cc on the 42nd st) (72 st)
32-33) With the dark grey yarn, sc in next 30 st (cc on the 30th) With the light grey yarn, sc in next 42 st (cc on the 42th st) (72 st)
34) With the dark grey yarn, sc in next 30 st (cc on the 30th st) With the light grey yarn, sc in next 42 st (do NOT change color on the 42th st) (72 st)
35) With the light grey yarn, sc in next st (cc on that st) With the dark grey yarn, sc in next 28 st (cc on the 28th st) With the light grey yarn, sc in next 43 st (72 st)
36) With the light grey yarn, sc in next 2 st (cc on the 2nd st) With the dark grey yarn, sc in next 26 st (cc on the 26th st) With the light grey yarn, sc in next 44 st (72 st)
37) With the light grey yarn, sc in next 3 st (cc on the 3rd st) With the dark grey yarn, sc in next 24 st (cc on the 24th st) With the light grey yarn, sc in next 45 st (72 st)
38-41) With the light grey yarn, sc in each st (72 st in each round)
42) *dec, sc 3* 6 times, sc in the next 42 st (66 st)
43) *dec, sc 2* 6 times, sc in the next 42 st (60 st)
44-59) sc in each st (60 st in each round)
*********************STOP!****************************
Insert the eyes into the body, one in round 47, and the other in round 58. embroider the mouth right between the eyes.
Begin stuffing the body, and continue stuffing as the work progresses.
*********************************************************
60) *dec, sc 8* 6 times (54 st)
61) sc in each st (54 st)
62) *dec, sc 7* 6 times (48 st)
63) sc in each st (48 st)
64) *dec, sc 6* 6 times (42 st)
65) *dec, sc 5* 6 times (36 st)
66) *dec, sc 4* 6 times (30 st)
67) *dec, sc 3* 6 times (24 st)
68) *dec, sc 2* 6 times (18 st)
69) *dec, sc 1* 6 times (12 st)
70) *dec* 6 times (6 st)
Fo, and sew the hole closed.
The Leg Pattern
Make 4. With the light grey yarn,
1) Mr, sc into the ring (5 st)
2) sc in each st (5 st)
3) sc 2 in each st (10 st)
4) sc in each st (10 st)
5) *sc 2 in next st, sc in next st* 6 times (15 st)
6) sc in each st (15 st)
Fo with a long tail. Attach the first two legs along rounds 15-20 of the body, and attach the other two along rounds 34-39 of the body/head area.
The Ear Pattern
Make 2. With the light grey yarn,
1) Mr, sc 6 into the ring (6 st)
2) sc in each st (6 st)
3) sc 2 in each st (12 st)
4) sc in each st (12 st)
5) *sc 2 in next st, sc in next st* 6 times (18 st)
Fo with a long tail. Press both sides together, and sew it closed. Attach the first ear along rounds 41-48, and the second one along rounds 54-61. Embroider two small striped right in between the ears with the dark grey yarn.
The Tail Pattern
Make 1. With the light grey yarn,
1) Mr, sc 6 into the ring (6 st)
2) sc 2 in each st (12 st)
3) *sc 2 in next st, sc in next st* 6 times (18 st)
4) sc in each st (18 st)
5) *sc 2 in next st, sc in next 2 st* 6 times (24 st)
6-10) sc in each st. On the last round, cc on the last st (24 st in each round)
11-12) With the dark grey yarn, sl st in next 8 st, sc in next 4 st, hdc in next 8 st, sc in next 4 st (24 st in each round)
13-14) sc in each st. On the last round, cc on the last st (24 st in each round)
15) With the light grey yarn, Sc in the first st, sl st in next 8 st, sc in next 4 st, hdc in next 8 st, sc in next 3 st (24 st)
16-18) sc in each st. On the last round, cc on the last st (24 st in each round)
19) With the dark grey yarn, sc in next 2 st, sl st in next 8 st, sc in next 4 st, hdc in next 8 st, sc in next 2 st (24 st)
20-22) sc in each st (24 st in each round)
Fo with long tail, and attach on round 8 of the body.
Congratulations! You just completed a cute and cuddly animal. Be sure to share your project on Pusheen's Ravelry page!
| | | | = | |

 RSS Feed